Owning vintage Macintosh can be great, but it may be a challenge to get disk images downloaded from the Internet onto a vintage Mac. One obvious way is to transfer files between networked Macs. The issue is that the earliest Macs did not have Ethernet and modern Macs no longer support LocalTalk. There needs to be a translation from one network architecture to the other. This translation component is called a network bridge. The bridge can be a dedicated computer running the bridge software or it can be a hardware bridge device.
Network Wiring Archetectures
- LocalTalk
- Ethernet
Support for LocalTalk spans from the Mac Plus to the iMac. PhoneNet adapters are connected to the serial port of the Mac and each PhoneNet adapter is connected with phone wire in a daisy chain.
All computers today come equipped with an Ethernet port
File Sharing Protocol
- AppleTalk (AFP)
Different versions of AFP support different platforms. With AFP version 3.0, Apple dropped support for AppleTalk file sharing. AFP version 2 supported both TCP/IP and AppleTalk. In order for both new and old Macs to share files, they must have an OS that is capable of running AppleTalk. For the newer Ethernet computers, AppleTalk IP works best on Mac OS 9, Mac OS 10.1 or 10.2. For the older Macs that cannot run Mac OS 8 or 9, System 6 or 7 can be used, System 7 is better.
Networking vintage Macintoshes can be a test in patience, to get the right hardware and versions of software, but is worth the perseverance. As previously stated, the bridge can be implemented in two ways, with a hardware or software bridge.
Hardware Bridge
Asanté made a bridge device called AsantéTalk, with one Ethernet port and one LocalTalk port. Used AsantéTalk bridge devices are not common, but not impossible to find. I picked up one on eBay for about $30, without a power supply.
The AsantéTalk bridge must be the first node on the LocalTalk network. To do this, a PhoneNet adapter is plugged into the LocalTalk port on the AsantéTalk bridge. One of phone jacks on the adapter is used to connect to another PhoneNet adapter on another computer with a phone cable. The other port is terminated with a terminator. The AsantéTalk supports up to 8 LocalTalk devices on the LocalTalk bus. With the AsantéTalk bridge off, each of the networks should be established individually.
For a vintage Mac running System 6, AppleTalk is installed manually from the System 6 disks. I wasn't able to share across the bridge with a System 6 Mac. I had to add another Mac onto the LocalTalk network as an intermediate hop for sharing files across the bridge. The LocalTalk network that I set up consisted of a Mac SE, running System 6 and a PowerBook 520c, running Mac OS 9. The Bridge is the first node on the LocalTalk network, with one port on the PhoneNet properly terminated. The PowerBook was second node and the SE was the third node, also with a port with a terminator.
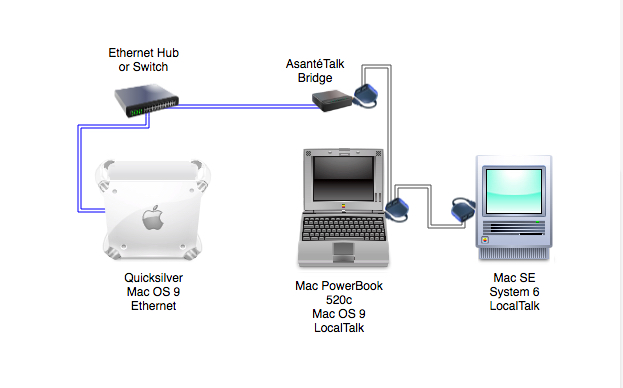
On the Ethernet side of the bridge, I had one computer, a Quicksilver Mac, running Mac OS 9, connected to an Ethernet hub. A switch can also be used. Other computers could be attached to the hub. In the Chooser dialog, on the Quicksilver Mac, AppleTalk should be Active. The AsantéTalk bridge is also connected to the hub. After the two networks are establish and connected to the bridge, plug in the power to the bridge and the bridge will connect to both networks.
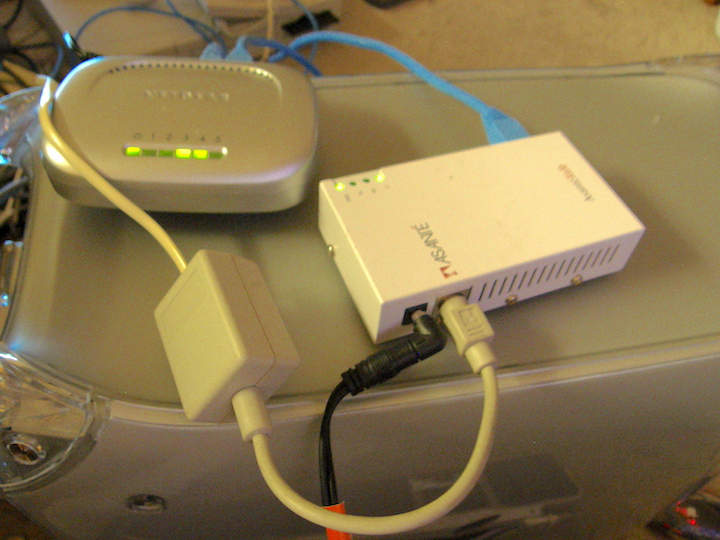
The above image shows the Ethernet hub and the AsantéTalk bridge. On same side of the bridge as the power cord, a PhoneNet adapter is plugged in to the LocalTalk port on the bridge. One of the ports on the adapter is terminated and the other has a phone cable running to the PhoneNet adapter on the laptop. On the other side of the bridge is the Ethernet port with a blue network cable, running from the port on the bridge to a port on the Ethernet hub. The network cable from the Quicksilver Mac is also plugged into the Ethernet hub.
Using the laptop as an intermediate node to the older Macs that had System 6, the SE was able to mount the PowerBook drive with AppleShare in the Chooser, on the LocalTalk network. This connection doesn't cross the bridge, but is local to the LocalTalk network. From the PowerBook laptop, I could mount the Quicksilver drive, through the bridge and the Quicksilver Mac was also able to mount the PowerBook drive.
Under this configuration, files can be copied to the SE, by first copying the files across the bridge to the laptop and then the SE could copy those files from the laptop.
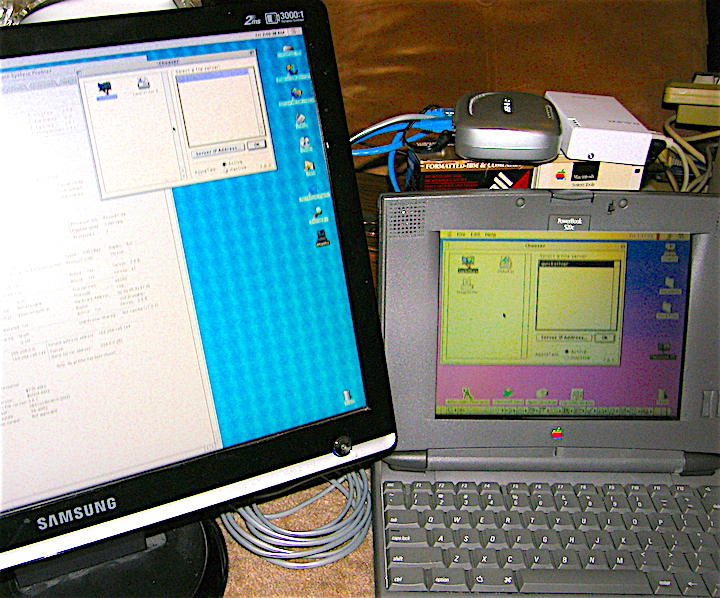
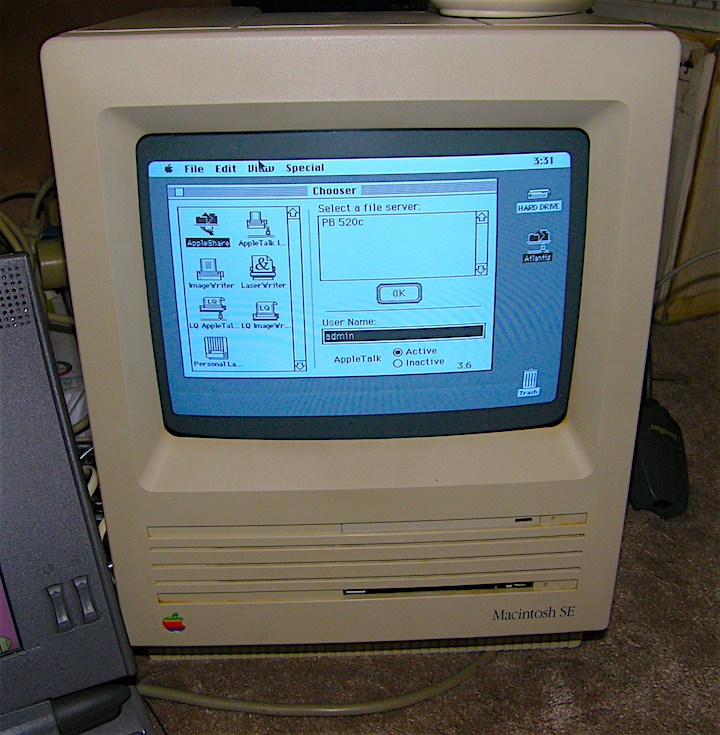
In the left image, above the laptop are the Ethernet hub and the AsantéTalk bridge. The monitor on the left is the Quicksilver Mac on Ethernet, with the laptop drive mounted through AppleTalk over IP on Mac OS 9. The laptop is a node on the LocalTalk chain and has the Quicksilver Mac drive mounted through AppleTalk on Mac OS 9. The right image is the SE, with the laptop drive mounted and running System 6. Since both the Quicksilver and the SE can mount the laptop drive, the laptop can be used as a shared storage space to get files from the Internet/Ethernet networked computers to the SE. On the Ethernet side, you will most likely be running a Mac with the current OS. In that case, you will need to use an older Mac, such as the Quicksilver Mac as a intermediate hop before going across the bridge.
Software Bridge
Apple developed a software bridge that can run on a PowerPC Macintosh that has both LocalTalk and Ethernet ports. The software is a Control Panel, which means it can only be used with Mac OS up to version 9. To install the Control Panel, drag the file onto the System Folder and it will ask you if you want to put it in the appropriate folder for Control Panels. There is an archived Apple support page that explains how to implement a LocalTalk or LaserWriter software bridge to an Ethernet network. Although, the link on the page to the software download is no longer valid, the bridge software can be downloaded from other sites.
With the bridge control panel installed, the bridge should be activated and set to public. Public allows computers on both side of the bridge to see each other. The software bridge uses the printer port, so make sure the printer port is not being used for something else. If AppleTalk is using the printer port, change it to use Ethernet. For the bridge computer, I used a Power Mac 6100 Performa, running Mac OS 8.5. The Power Mac 6100 has an AAUI (Apple Attachment Unit Interface) Ethernet port, instead of the standard RJ-45 port, so an AAUI adapter must be plugged into the AAUI Ethernet port on the Power Mac.
The setup for a software bridge is basically the same as a hardware bridge, setup each of the networks, attach each of the networks to the bridge computer and turn on the bridge. The PowerPC Mac has both Ethernet and LocalTalk ports. A PhoneNet adapter is plugged in the LocalTalk port and a network cable is connected to the Ethernet AAUI adapter on the Power Mac.
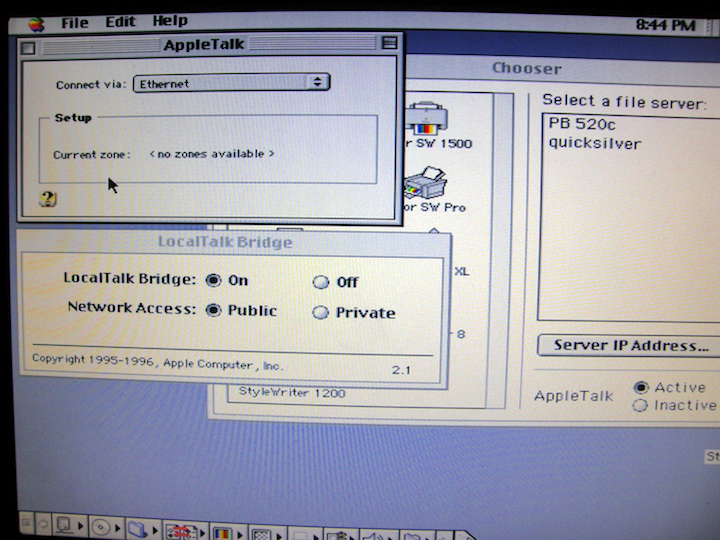
Above is the Power Mac bridge computer screen with AppleTalk on Ethernet and the LocalTalk Bridge turned on in the control panel and Network Access set to Public. In the Chooser pane, there is listed both computers, on either side of the bridge.
© 2016 by Roger Gibby. Images of Mac models in AsantéTalk Bridge diagram copyrighted by Ian Page. Apple logo is trademarked by Apple Inc. The image of software LocalTalk bridge is copyright by Apple Inc.